Saturday, November 27, 2021

SOLID Principle


Introduction

 
To design and develop high-quality software, well–established design principles need to be  followed. Those five principles make the acronym S-O-L-I-D. That’s what this article is all about.
 
I will explain SOLID principles in this article. Let’s start with what the SOLID principle is.
 

What is SOLID?

 
SOLID stands for
  1. S- Single Responsible Principle (SRP).
  2. O- Open Closed Principle (OSP).
  3. L- Liskov Substitute Principle (LSP).
  4. I- Interface Segregation Principle (ISP).
  5. D- Dependency Inversion Principle (DIP).
Michael Feathers introduced the SOLID acronym in the year 2000. SOLID is a design principle that plays a very important role during Object-Oriented design. Software development becomes easy, reusable, flexible, and maintainable using these design principles.
 
Robert C Martin has promoted SOLID Principles and now it’s very famous. It has changed the development approach and dominated in software development industries.
 
Benefits of SOLID
  1. It makes software design more understandable, flexible, and maintainable.
  2. Best suitable principle can be used as per project requirement.
  3. Loosely coupled.
  4. Parallel Development.
  5. Testability.
  6. Code becomes smaller and cleaner
  7. Maintainability – Large Systems or Growing systems become complicated and difficult to maintain. This Principle helps us to create a maintainable system. A maintainable system is very important in industries.

Single Responsible Principle (SRP)

 
Robert C Martin's original definition is, "A class should have only one reason to change".
 
As the SRP name says, each and every module/class should have single responsibility in software, and that responsibility is  encapsulated by the class.
 
If a single class has multiple responsibilities it may cause problems. To avoid these problems we should separate responsibilities in multiple classes or modules.
 
Let’s start with a simple example. Suppose we have a company that creates new members and logs error messages.
 
 
What is the code doing? This code has 2 responsibilities
  1. Add newly added member in the database
  2. Logging activities that log errors in a text file.
What will we be doing if we want to log errors in the event viewer or in the database? We have to change the logging code in all the classes including member class. This means member functionality is not changed but still, we have to touch member class because of logging. This violates first principle (Single class or module should have a single responsibility).
 
Now we will separate these two responsibilities in 2 separate classes,


In the above code, two separate classes (Members and Logger) have their own responsibilities, which solved earlier problems in the code and fulfill the single responsibility Principle.
 

Open Close Principle (OCP)

 
Bertrand Meyer defines OCP in 1988, “Software entities (classes, modules, functions, etc.) should be open for extension, but closed for modification.”
 
Let’s now discuss on what are the problems this principle solved,
 
Suppose we want to introduce member type and based on the type we want to give/calculate the discount.
 
 
Let’s think, what is the problem with the above code? If we want to add another member type, we have to change the working member class code and here we use the Open close principle.
 
OCP says a class should be,
  1. Open for extension – means we need to create a base class and that class will be available for extension. This class should have common functionality.
  2. Close for Modification – Instead of changing the base class, we will extend the base class and add/modify type-specific coding in the derived class.
Assume that we have two types, if MeberType =1 (IMP Member) and MemberType =2 (VIMP Member) and a base class Members. Let's try to undestand using the below diagram.
 
As base class (Members) is open for extension, derived classes inherited it and extend their functionality as per requirement. In future if we want to add another type, we have to add another derived class.
 
Let's see the below code,
 
 
In the above code, 1 is Base Class and 2&3 are Derived classes. Derived class extended base class and modified discount as per type.
 
So in simple words, the Member base class is closed for modification but open for extensions.
 

Liskov Substitution Principle (LSK)

 
Barbara Liskov introduced this principle in 1987 in the conference (Data abstraction and hierarchy) hence it is called the Liskov Substitution Principle (LSK). This principle is just an extension of the Open Close principle.
 
Robert C Martin also defines this principle. His definition of LSK is “Functions that use pointers or references to base classes must be able to use objects of derived classes without knowing it”.
 
Before we start on LSK, we should have a basic understanding of polymorphism. The polymorphism rule says that during runtime, the parent/base class object can point to any child/derived class object without any error.
 
Suppose we have members class example as per below,
 
 
In the above example, we have
  1. Base class member which has method Virtual - Add() method to add a member.
  2. IMPMember derived class has override - Add() method to add IMPMember.
  3. VIMPMember derived class has override- Add() method to add VIMPMember.
  
 
We will use same class throughout the article now.
 
Now let’s assume that we need to introduce functionality for Enquiry, which means that anyone can enquire and become a member. A company decided to give a discount to anyone who came for an enquiry, so they can become a member.
 
Let’s now create a Member class,
 
 
In the above class example, we have 2 methods:
  1. getDiscount
  2. Add – Which override from parent member.
Now we will try to invoke the members list using base (members) class objects and call add methods. Base class object can point to any child class objects without any issues as per inheritance hierarchy.
 
 
The above code throws an error as the Enquiry class doesn’t have an Add method.
 
Let’s implement the Liskov principle. In this case Liskov principle says parent class object can easily replace child objects. So to implement the Liskov principle here, we will create two different interfaces :
  1. IDatabase – Content Add method.
  2. IDiscount – Content getDiscount method.
 
IDatabase & IDiscount interface implemented to Members, IMPMember, VIMPmember classes. As the inquiry class doesn’t have an Add method only IDiscount interface implemented.


That’s all for LSK, now we can create a list of IDatabase and add relevant classes to it to get a list of all members.
 

Interface Segregation Principle (ISP)

 
Robert C Martin's definition of ISP, “Clients should not be forced to depend upon interfaces that they do not use.”
 
Let’s try to understand with an example, suppose our member's class become so popular and thousands of companies are using it. Now a new company wants to implement members class with new functionality read members.
 
What will we do in this case? If we will change IDatabase interface and add a new function called ReadMemeber then thousands of existing companies will be impacted which will not use read functionality.
 
ISP principle helps us to solve this problem,
  1. Instead of adding a new method in existing members-interfaces, will create a new interface.
  2. IDatabase 1 – Inherit IDatabase and add a new method ReadMember() method in it.
  
 
Now new member would be as per below,
 
 
So old company members continue using “IDatabase” interface and new company members can start using the new interface “IDatabase1”.


Dependency Inversion principle (DIP)

 
Robert C Martin has defined DIP as, “High-level modules should not depend on low-level modules. Both should depend on abstractions. Abstractions should not depend on details. Details should depend on abstractions”.
 
Let’s try to understand this principle with an example,
 
In the first principle, we have created a logger class that is used in members class. Let’s imagine, now we have a requirement to log details in EvernViwer, Database or in the file. To achieve this we need to create
 
1. Interface called ‘ILogger’. This interface has a method called Handle.
 
 
2. Create three classes FileLogger, EverViewerLogger, EmailLogger implementing ILogger interface.
 
 
3. Create Members base class as per below
 
 
In the first view, all looks good. Right? But if you see closely, you will notice that we violate single responsibility principle. We are creating logger objects in Members class.
 
To solve this we will apply DIP here,
 
 
Now the client is responsible for injecting logger object and our members class free from IF conditions. We have removed logger dependency and that’s the last principle. We can use different methodologies to remove the dependency, and we will discuss that incoming article.
 
I hope you enjoy this article and that it helped you to understand SOLID principles. 

    Dependency Injection


    Dependency Injection

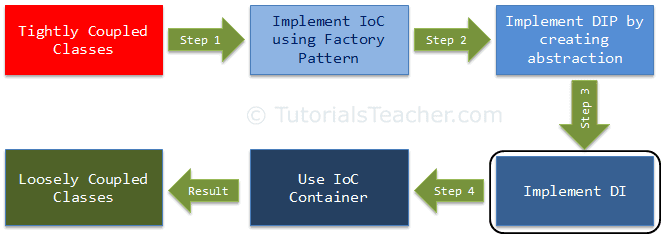
    In the previous chapter, related to DIP, we created and used abstraction to make the classes loosely coupled. Here, we are going to implement Dependency Injection and strategy pattern together to move the dependency object creation completely out of the class. This is our third step in making the classes completely loose coupled.

    dependency injection

    Dependency Injection (DI) is a design pattern used to implement IoC. It allows the creation of dependent objects outside of a class and provides those objects to a class through different ways. Using DI, we move the creation and binding of the dependent objects outside of the class that depends on them.

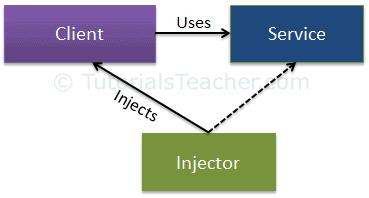
    The Dependency Injection pattern involves 3 types of classes.

    1. Client Class: The client class (dependent class) is a class which depends on the service class
    2. Service Class: The service class (dependency) is a class that provides service to the client class.
    3. Injector Class: The injector class injects the service class object into the client class.

    The following figure illustrates the relationship between these classes:

    Dependency Injection
    Dependency Injection

    As you can see, the injector class creates an object of the service class, and injects that object to a client object. In this way, the DI pattern separates the responsibility of creating an object of the service class out of the client class.

    Types of Dependency Injection

    As you have seen above, the injector class injects the service (dependency) to the client (dependent). The injector class injects dependencies broadly in three ways: through a constructor, through a property, or through a method.

    Constructor Injection: In the constructor injection, the injector supplies the service (dependency) through the client class constructor.

    Property Injection: In the property injection (aka the Setter Injection), the injector supplies the dependency through a public property of the client class.

    Method Injection: In this type of injection, the client class implements an interface which declares the method(s) to supply the dependency and the injector uses this interface to supply the dependency to the client class.

    Let's take an example from the previous chapter to maintain the continuity. In the previous section of DIP, we used Factory class inside the CustomerBusinessLogic class to get an object of the CustomerDataAccess object, as shown below.

    public interface ICustomerDataAccess
    {
        string GetCustomerName(int id);
    }
    
    public class CustomerDataAccess: ICustomerDataAccess
    {
        public CustomerDataAccess() {
        }
    
        public string GetCustomerName(int id) {
            return "Dummy Customer Name";        
        }
    }
    
    public class DataAccessFactory
    {
        public static ICustomerDataAccess GetCustomerDataAccessObj() 
        {
            return new CustomerDataAccess();
        }
    }
    
    public class CustomerBusinessLogic
    {
        ICustomerDataAccess _custDataAccess;
    
        public CustomerBusinessLogic()
        {
            _custDataAccess = DataAccessFactory.GetCustomerDataAccessObj();
        }
    
        public string GetCustomerName(int id)
        {
            return _custDataAccess.GetCustomerName(id);
        }
    }
    

    The problem with the above example is that we used DataAccessFactory inside the CustomerBusinessLogic class. So, suppose there is another implementation of ICustomerDataAccess and we want to use that new class inside CustomerBusinessLogic. Then, we need to change the source code of the CustomerBusinessLogic class as well. The Dependency injection pattern solves this problem by injecting dependent objects via a constructor, a property, or an interface.

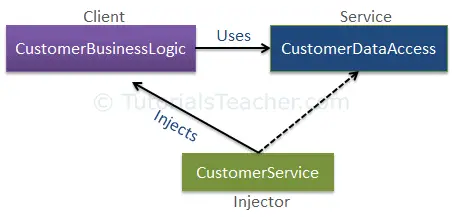
    The following figure illustrates the DI pattern implementation for the above example.

    Dependency Injection

    As you see, the CustomerService class becomes the injector class, which sets an object of the service class (CustomerDataAccess) to the client class (CustomerBusinessLogic) either through a constructor, a property, or a method to achieve loose coupling. Let's explore each of these options.

    ADVERTISEMENT

    Constructor Injection

    As mentioned before, when we provide the dependency through the constructor, this is called a constructor injection.

    Consider the following example where we have implemented DI using the constructor.

    Example: Constructor Injection - C#
    public class CustomerBusinessLogic
    {
        ICustomerDataAccess _dataAccess;
    
        public CustomerBusinessLogic(ICustomerDataAccess custDataAccess)
        {
            _dataAccess = custDataAccess;
        }
    
        public CustomerBusinessLogic()
        {
            _dataAccess = new CustomerDataAccess();
        }
    
        public string ProcessCustomerData(int id)
        {
            return _dataAccess.GetCustomerName(id);
        }
    }
    
    public interface ICustomerDataAccess
    {
        string GetCustomerName(int id);
    }
    
    public class CustomerDataAccess: ICustomerDataAccess
    {
        public CustomerDataAccess()
        {
        }
    
        public string GetCustomerName(int id) 
        {
            //get the customer name from the db in real application        
            return "Dummy Customer Name"; 
        }
    }
    

    In the above example, CustomerBusinessLogic includes the constructor with one parameter of type ICustomerDataAccess. Now, the calling class must inject an object of ICustomerDataAccess.

    Example: Inject Dependency - C#
    public class CustomerService
    {
        CustomerBusinessLogic _customerBL;
    
        public CustomerService()
        {
            _customerBL = new CustomerBusinessLogic(new CustomerDataAccess());
        }
    
        public string GetCustomerName(int id) {
            return _customerBL.ProcessCustomerData(id);
        }
    }
    

    As you can see in the above example, the CustomerService class creates and injects the CustomerDataAccess object into the CustomerBusinessLogic class. Thus, the CustomerBusinessLogic class doesn't need to create an object of CustomerDataAccess using the new keyword or using factory class. The calling class (CustomerService) creates and sets the appropriate DataAccess class to the CustomerBusinessLogic class. In this way, the CustomerBusinessLogic and CustomerDataAccess classes become "more" loosely coupled classes.

    Property Injection

    In the property injection, the dependency is provided through a public property. Consider the following example.

    Example: Property Injection - C#
    public class CustomerBusinessLogic
    {
        public CustomerBusinessLogic()
        {
        }
    
        public string GetCustomerName(int id)
        {
            return DataAccess.GetCustomerName(id);
        }
    
        public ICustomerDataAccess DataAccess { get; set; }
    }
    
    public class CustomerService
    {
        CustomerBusinessLogic _customerBL;
    
        public CustomerService()
        {
            _customerBL = new CustomerBusinessLogic();
            _customerBL.DataAccess = new CustomerDataAccess();
        }
    
        public string GetCustomerName(int id) {
            return _customerBL.GetCustomerName(id);
        }
    }
    

    As you can see above, the CustomerBusinessLogic class includes the public property named DataAccess, where you can set an instance of a class that implements ICustomerDataAccess. So, CustomerService class creates and sets CustomerDataAccess class using this public property.

    Method Injection

    In the method injection, dependencies are provided through methods. This method can be a class method or an interface method.

    The following example demonstrates the method injection using an interface based method.

    Example: Interface Injection - C#
    interface IDataAccessDependency
    {
        void SetDependency(ICustomerDataAccess customerDataAccess);
    }
    
    public class CustomerBusinessLogic : IDataAccessDependency
    {
        ICustomerDataAccess _dataAccess;
    
        public CustomerBusinessLogic()
        {
        }
    
        public string GetCustomerName(int id)
        {
            return _dataAccess.GetCustomerName(id);
        }
            
        public void SetDependency(ICustomerDataAccess customerDataAccess)
        {
            _dataAccess = customerDataAccess;
        }
    }
    
    public class CustomerService
    {
        CustomerBusinessLogic _customerBL;
    
        public CustomerService()
        {
            _customerBL = new CustomerBusinessLogic();
            ((IDataAccessDependency)_customerBL).SetDependency(new CustomerDataAccess());
        }
    
        public string GetCustomerName(int id) {
            return _customerBL.GetCustomerName(id);
        }
    }

    Thursday, November 25, 2021

    Find 2nd ,3rd or Nth Highest salary using LINQ


    var Customer = Customers.OrderByDescending(x => x.salary)

    .Select(x => x.salary).Distinct().Take(NthNumber_Salary)

    .Skip(NthNumber_Salary - 1).FirstOrDefault();  

     Console.Write("3rd Highest Salary is: " + ee);

    Difference Between First() And FirstOrDefault()

    The major difference between First and FirstOrDefault is that First() will throw an exception if there is no result data for the supplied criteria whereas FirstOrDefault() will return the default value (null) if there is no result data.

     
    First() will throw an exception if there is no result data, as you can see below.
     
    Difference between First() and FirstOrDefault()
     FirstOrDefault() returns the default value (null) if there is no result data and you can see the result in the following screen.
     
    Difference between First() and FirstOrDefault()

      Difference Between Throw and Throw ex in C#


      static void Main(string[] args) {
          try {
              ThrowException1(); // line 19
          } catch (Exception x) {
              Console.WriteLine("Exception 1:");
              Console.WriteLine(x.StackTrace);
          }
          try {
              ThrowException2(); // line 25
          } catch (Exception x) {
              Console.WriteLine("Exception 2:");
              Console.WriteLine(x.StackTrace);
          }
      }
      
      private static void ThrowException1() {
          try {
              DivByZero(); // line 34
          } catch {
              throw; // line 36
          }
      }
      private static void ThrowException2() {
          try {
              DivByZero(); // line 41
          } catch (Exception ex) {
              throw ex; // line 43
          }
      }
      
      private static void DivByZero() {
          int x = 0;
          int y = 1 / x; // line 49
      }

      and here is the output:

      Exception 1:
         at UnitTester.Program.DivByZero() in <snip>\Dev\UnitTester\Program.cs:line 49
         at UnitTester.Program.ThrowException1() in <snip>\Dev\UnitTester\Program.cs:line 36
         at UnitTester.Program.TestExceptions() in <snip>\Dev\UnitTester\Program.cs:line 19
      
      Exception 2:
         at UnitTester.Program.ThrowException2() in <snip>\Dev\UnitTester\Program.cs:line 43
         at UnitTester.Program.TestExceptions() in <snip>\Dev\UnitTester\Program.cs:line 25
      

      You can see that in Exception 1, the stack trace goes back to the DivByZero() method, whereas in Exception 2 it does not.

      Take note, though, that the line number shown in ThrowException1() and ThrowException2() is the line number of the throw statement, not the line number of the call to DivByZero(), which probably makes sense now that I think about it a bit...

      Output in Release mode

      Exception 1:

      at ConsoleAppBasics.Program.ThrowException1()
      at ConsoleAppBasics.Program.Main(String[] args)
      

      Exception 2:

      at ConsoleAppBasics.Program.ThrowException2()
      at ConsoleAppBasics.Program.Main(String[] args)
      

      Is it maintains the original stackTrace in debug mode only?